Simply a domain name is an unique identifier which can be organized in different levels. Yeah it's an online identity. Owning a preferable web address for your online presence is matters as it helps you to familiar with your audience. As you know Blogger is a free blogging platform which helps online users to spread their voice.
As your blog hosted on Blogger and registered there, your blog address or URL is based on blogspot domain. I mean your web address appears as Mayura4Ever.blogspot.com or something like that, right? But would you like to manage your own identity and increase visibility online without having blogspot or something mentioned in your blog address?
As your blog hosted on Blogger and registered there, your blog address or URL is based on blogspot domain. I mean your web address appears as Mayura4Ever.blogspot.com or something like that, right? But would you like to manage your own identity and increase visibility online without having blogspot or something mentioned in your blog address?
Why You Need a Custom Domain?
Custom domain or owning your own registered domain would be helpful to increase your brand identity online. Further you will be able to experience more features or services related to your domain which you couldn't able to experience as you were in blogspot web address and it will also handover some control over to you.
As it adds more value to your brand, visitors and readers who stop by your blog will start thinking that how much you are dedicated for your business or blogging activity. Isn't it true that sometimes people tend to trust sites on custom domains rather than which exists in free platforms? So, of course it will improve visibility and increase reputation. You will get more exposure for your blog as you maintain an unique identity on the web. In addition, you will find that more advertising and / or such opportunities will come on your way.
As it adds more value to your brand, visitors and readers who stop by your blog will start thinking that how much you are dedicated for your business or blogging activity. Isn't it true that sometimes people tend to trust sites on custom domains rather than which exists in free platforms? So, of course it will improve visibility and increase reputation. You will get more exposure for your blog as you maintain an unique identity on the web. In addition, you will find that more advertising and / or such opportunities will come on your way.
Moving to a custom domain is not a free option and not pricey either. But moving to a custom domain can cost you in another way and you need to make sure what gonna be change. Registering and moving to a custom domain via Blogger doesn't change your content and you don't need to worry about content on your blog. They will stays as same it was.
As you move to a new URL, you will lose some rankings you had previously such as Alexa and Google PageRank, sharing counts may set to zero and would be problematic if you have integrated 3rd party applications such as comment forms but only if they doesn't compatible with domain migration. So you need to take a closer look at services you use on your blog and take precautionary actions before you migrate to a new domain.
As you move to a new URL, you will lose some rankings you had previously such as Alexa and Google PageRank, sharing counts may set to zero and would be problematic if you have integrated 3rd party applications such as comment forms but only if they doesn't compatible with domain migration. So you need to take a closer look at services you use on your blog and take precautionary actions before you migrate to a new domain.
Setting Up via Blogger
If you buy and set up a custom domain directly from Blogger, your domain will be registered by Google. What, now they registering domains too? Owh... No... No... Google doesn't register your domain. Google is partnered with few domain registrars to provide you custom domains and related services. The registration will be happen through Google Apps website and hence in addition to domain registration which gets your favorite domain name for your blog, you will get a pre-configured Google Apps account with numerous Google services for your domain.
Also you don't need to worry about your old post links, 'cause all your old post links will redirected to your new domain. It means, even if someone has a link to your post which refers to old blogspot address, it will send that user to new URL in your new domain. Therefore you don't need to worry about the traffic you get. Here's list of features I was able to find out when I configure a custom domain via Blogger,
Also you don't need to worry about your old post links, 'cause all your old post links will redirected to your new domain. It means, even if someone has a link to your post which refers to old blogspot address, it will send that user to new URL in your new domain. Therefore you don't need to worry about the traffic you get. Here's list of features I was able to find out when I configure a custom domain via Blogger,
● Private Domain Registration - Typically if you register a domain, your personal details can be viewed via WHOIS directory by default if you not selected private registration option which costs you few more bucks. But if you register your domain via Blogger, it offers private registration feature with no cost to ensure your privacy.
● Domain Locking - Once you purchased your domain name, it will stay locked until it expires and then no one will be able to transfer your domain, so it will prevent unauthorized domain transfers.
● Pre-configured DNS Records - When you set up a custom domain, typically you will need to update new domain's DNS records to map your existing blog to rendered under new domain name. But here your blog will be configured automatically and you don't need to worry about configuration.
● Auto Renew Domain - Your will prompt to renew your domain annually when it's closer to expire and you don't need to worry about expiration date of your domain.
● Automatically Configured with Google Apps - As you get a Google Apps for Business account with your domain registration, it will be configured automatically for your custom domain. Google Apps for Business account will carry Google services such as Gmail, Google Talk, Google Calendar, Google Docs, Picasa, Google Drive etc. which matters and enhanced to use with your domain. For example, you can create personalized emails correspond to your domain for users who manage your domain and each of them will receive 25 GB email storage plus access to other Google services. It would be really productive.
● Easy Domain and User Management - You can easily manage your domain settings including DNS records related to your domain to make necessary changes and also you will able to add more users to manage your domain and business applications through Google Apps integration.
● Lower Cost and Time Saving - With all above features, the price tag of a custom domain is $10 per year. That is affordable and lower if you compare with other domain registration options on the web. However there are some situations you will find that cost is lower outside. But yet $10 is an affordable price. Also as it's automatically configure for Blogger blogs, you will hard to find a situation where you need technical support.
However as I find, the only problem of domain registration through Blogger would be,
○ Offer Few Top Level Domain Names - Here you will able to get your domain name with few popular top level domains only. Currently it supports .com, .net, .org, .info and .biz.
Anyway it's not a critical if you don't wanna go for other top level domain names except for mentioned above.
Before You Go:
* If you have third party applications or tools such as comment forms implemented or configured for your existing blog, you may need to check out that they are supporting domain migration to keep them as it is without losing any data related.
For example, if you have 3rd party comment platform implemented in your blog, please make sure that you can migrate without losing your existing comments. Else you need to take a tough decision.
For example, if you have 3rd party comment platform implemented in your blog, please make sure that you can migrate without losing your existing comments. Else you need to take a tough decision.
Steps:
1. Go to Blogger Dashboard.
2. Click on your Blog Title.
3. Navigate to Settings tab from left pane.

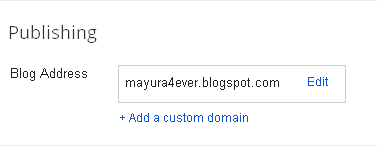
4. Find Publishing heading on Basic tab and underneath you will see your current blog address.

5. Now click Add a custom domain link.
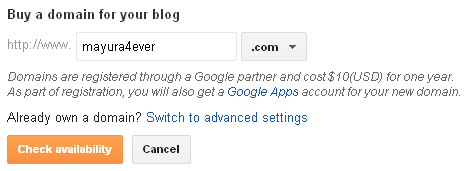
6. You will prompt to enter your preferred domain name you would like to have for your blog and make sure to select your preferred top level domain name - i.e: .com, .net, .org etc. By default it selects .com top level domain name for you.

7. Now click Check availability button to see if your preferred domain name is already registered or not.
8. On next page, you will get to know that the preferred domain name you entered was registered or not. There are possibly two scenarios that can happen,
Your Preferred Domain Name is Available: If it's available, just one word - Lucky You.
Your Preferred Domain Name is Not Available: If it's already taken, you will have to go for another domain name. Use either suggested similar available names currently available or Find another domain name option to try out another domain name of your choice, until you find an available domain name that you prefer to have for your blog.
9. Once you able to get an available domain name, click Continue to registration button to proceed.

Note: You can select your preferred partner to register your domain by clicking Learn more link next to the partner name before click Continue to registration button.
10. Now you need to fill up a form with your details to register your domain. After filling all required fields with valid information and checking required check boxes after reading terms, click I accept. Proceed to Google Checkout button.
Notes:
* You can enable Privacy Option if you don't need anyone to view your domain registration details you enter here.
* Enabling Automatically renew my registration every year option will renew your domain each year automatically using your connected payment method. If you wanna renew it manually, you can disable that option.
11. Now you will ask to log in to your Google account to use Google Wallet service and proceed with payment using your Credit card.
Note: You will receive an email to set up Google Apps for your domain after the payment process.
More Information:
* Eventhough you set up a domain name with www, you will also need to redirect to your blog even if users type your domain name without preceding www. So make sure to enable redirection. Read How to Enable Domain Redirection in Blogger.
Enjoy :-)


