


Do you like customizing your blog on Blogger? Yeah, mostly you would say "Yes" as you wanna reflect your personality through the look and feel, or need to have things in your way. Blogger has set of customization options that helps personalize your blog according to your preferences. Not everything, but yet most are customizable.
Recently Blogger started being more SEO friendly by adding capability to insert search descriptions for posts and blog itself. Let's say more user friendly as long as we write for awesome readers, and SEO features help people find relevant content they are looking for. Talking about SEO features, have you ever wanted to have custom URLs for your blog posts?
Recently Blogger started being more SEO friendly by adding capability to insert search descriptions for posts and blog itself. Let's say more user friendly as long as we write for awesome readers, and SEO features help people find relevant content they are looking for. Talking about SEO features, have you ever wanted to have custom URLs for your blog posts?
Custom Permalinks
Earlier your Blogger post URLs were based on the post title you specified. Now, Blogger offers you the freedom of selecting a custom URL for your posts, unless you prefer having automatic URL generation. Blogger introduce this feature as Custom Permalinks.
If you are not familiar with the term Permalink, it is the actual URL of your blog post. Got it, right? Now you can personalize the URL of your posts before they get published, which means it's applicable for new posts and posts in draft which never been published.
If you are not familiar with the term Permalink, it is the actual URL of your blog post. Got it, right? Now you can personalize the URL of your posts before they get published, which means it's applicable for new posts and posts in draft which never been published.
However you can't change the whole URL. Obviously you don't need to fetch a different domain name to your URL and Blogger keeps year and month mentioned in the URL, as I believe, to consistent with URL structure on the blog - i.e: /2012/07. Rest of the URL is what you can take control of. For example, take a look at below bolded text area in the given URL.
http://www.mayura4ever.com/2012/07/how-to-create-custom-urls-for-your.html
For this post, I've applied a custom URL and you can clearly see what has changed below,
http://www.mayura4ever.com/2012/07/create-blogger-custom-permalinks.html
Make sure that you aren't using extremely long custom URLs for your posts though you have freedom to do so. URLs will work even if you use long custom URLs, but that would be odd and steal more space when sharing. Don't do that mistake.
Once after publishing your post, you won't be able to change the URL unless you revert it back to draft. However if you revert a post and change the title of your post while having permalink set to Automatic URL, your previous URL will be updated with new post title. So if you wanna update a title of a post, just update it without reverting it to draft, so the URL won't be affected.
Else if the URL has changed, visitors who used to visit your page or bookmarked earlier will be confused and stare at Page Not Found error when landing on old URL. If you have no idea at all, you better use Custom URL option only for all your new posts from now on, to be on the safe side eventhough you wanna update post title later. Further, make sure you won't set duplicate custom URLs, 'cause Blogger won't let you have same URL for two posts published in the same month.
What's in it for You?
Changing URL or having a custom URL is really a cool feature. Don't you like having a preferred URL instead of an URL generated based on title? If it's a meaningful and descriptive URL, the URL itself may speak about the topic before visitors land on your blog post.
Further it adds SEO value if you make use of this feature with right keywords. When a searcher search for something on the web, search engines do count the words included in URLs too. Hence, if you have meaningful keywords or terms integrated in your post URL, search engines will favor your post over others which didn't and present it to relevant audience on first search results pages. Don't you wanna collaborate with search engines and help them target your content effectively for people searching for your content?
Further it adds SEO value if you make use of this feature with right keywords. When a searcher search for something on the web, search engines do count the words included in URLs too. Hence, if you have meaningful keywords or terms integrated in your post URL, search engines will favor your post over others which didn't and present it to relevant audience on first search results pages. Don't you wanna collaborate with search engines and help them target your content effectively for people searching for your content?
Steps:
1. Go to Blogger Dashboard.
2. Click on your Blog Title.
3. Now click New Post button to create new post or jump to Draft posts under Posts tab and click Edit link correspond to post you wanna create a custom URL.
4. Head over to Settings on right sidebar and click on Permalink setting.

5. Now you will see the two options for the permalink - Automatic URL and Custom URL. If you are not happy with the suggested automatic URL based on your post title displayed there, select Custom URL option.
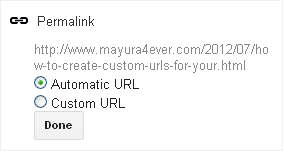
6. Enter your preferred custom URL there. You can use uppercase and lowercase regular characters, numbers, dash ( - ), underscore ( _ ) and period ( . ) for constructing your custom URL. You can see how your custom URL will be as your type in the field.
Note: Make sure you are not leaving any spaces when creating your custom URL. However you will be notified if you did so.
7. Once after you entering your preferred custom URL or your post, click Done button there.
8. Now you can finish your post and publish it, or save it to publish later on.
Note: Your custom URL will be effective upon publishing your post. Until then you can change your custom URL.
Enjoy :-)
