There's one thing that my Human Resource Management lecturer always used to say - Each person is unique. People can be differentiated with their skills, abilities, ideas, intuitions or such qualities. But being unique doesn't mean that we wanna stay away from each others. People mostly working together to be effective and efficient instead of being individuals to achieve goals. They always find something similar among them to get connected and stay in touch. Something they all love. Like you and me. Yeah, Common Interests. People love to get together and talk and share about them. That is where the need of a "Group" pops in. Don't you wanna get into a group and share interests with like-minded people rather than exposing all of them to public or other friends who are not interested in?
Why Do You Need a Group?
People can group for vivid activities and intentions or reasons. You can group with your family members to share what private and related to your family. School friends can group and share memories about their school life. Co-workers can group together to discuss about a new project they working on. Friends interested in same niche can join in and discuss about latest news on that niche. So, you see, there could be plenty of reasons for you to group with your friends and interesting people you wanna hang out. And absolutely, privacy matters in different groupings. When it comes to Facebook where 900 millions engaged in, it is the best place you can find most of your friends easily too. So grouping and sharing interests can be much effective on Facebook.
Facebook Page vs Facebook Group
We've already learnt how a Facebook page can be useful for your business, brand, organization or as a celebrity. But it doesn't suite when it comes to group activities. Facebook pages are especially created to represent an real world entity to communicate with fans. If you wanna find small space to group and communicate with friends or family, Facebook offers you Facebook Groups. Facebook Groups let you share, discuss and strengthen relationships by posting updates, asking questions and chatting with group members. To enhance productivity and privacy, Facebook offers several privacy options for groups in case if you wanna customize visibility of your group. As most of your friends spend time on Facebook, you will love to bring them on and share interests as never before using Facebook groups.
Little Bit of Mine...
Personally, most of my friends on Facebook not interested in my niche. I mean, not keen in Technology so much. Eventhough they show some interest, they are not digging it. So I find the Facebook group I happen to create lately useful for me rather than sharing or posting those subjective updates on my timeline. It leads to useful conversations sometimes. I started to learn more than being idle and I hope other members enjoying it too. But I don't know exactly, you gotta come and ask them ;) Also I'd like to invite you to have a look and join with Information Madness Facebook group if you are interested in. Whoa... Just pop up an idea to create a group on Facebook? Let's create one and start sharing interests.
Steps:
1. Log in to your Facebook account.
2. Navigate to Facebook Groups Bookmarks page.
3. Click on Create Group button on top.
4. Now you will get Create New Group pop-up box and fill it out with relevant information.
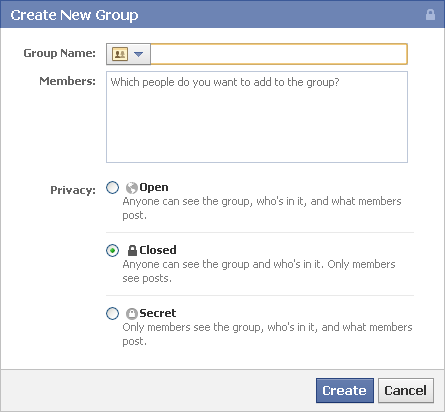
Group Name - Enter your preferred group name. You can change it whenever you need later. Further you can select an icon for your group by clicking on drop down iconic button.
Members - Add members for your group here. You need to specify at least one friend But your friends only. Just enter first few characters of friend's name and a list will pop up with matching friend profiles, so you can select intended person from the list. But always try to add best fit friends for your group 'cause sometimes your friends may not interested in. The best possible option is ask them before you join them to your group. However there's no limit of members for groups.
Privacy - You can set up privacy or control who can see your group with given options - Open (Public), Closed and Secret. You can find related description for each privacy option, just beneath the corresponding option. However you can change privacy settings for your group later too.
5. Once you done with filling information, click Create button.
6. Now your group will be created and direct automatically to your new group. You can start posting from there.
More Information:
* You can add more friends to your group using Add Friends to Group text box displays on the right pane.

* You can add group photo to appear at the top of your page. Just move your mouse pointer just above group bar and you will start to see add image icon. Click on it and upload a photo using Upload a Photo menu item.
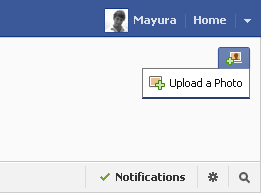
Note: You should select an image which is at least 400 pixels wide.
* If you wanna change group settings, click gear icon select Edit Group option.
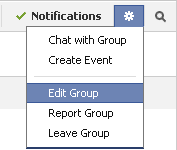
Note: There you can change your group name, privacy, permissions and able to add a description for your group. Further you can set up email address for your group too.
* You can promote your friends as admins in your group, so they can manage your group too. Just jump to About tab, find your friend and click Make Admin link beneath your friend. If you wanna revoke admin privileges, click Remove Admin link beneath relevant friend.
Note: Admins are authorized to promote friends as admins, revoke admin privileges of existing admins, delete posts from members, remove or ban members, edit group settings and delete group.
* You can create events for your group at Events tab, view photos published on your group at Photos tab and use Docs tab to create simple documents.
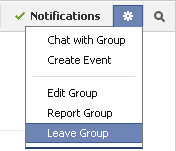
* If you wanna delete your group, you have to remove all members from the group and at last you have to leave your group. Navigate to About tab from the top bar and remove all friends by clicking X icon next to each member's name. Then click on the gear icon on top bar and select Leave Group. You will need to confirm before you leave.
Enjoy :-)


