Have you ever wanted to use or share a screenshot of a web page? Yeah, I know you are thinking about it in this moment. There could be lot of reasons you might wanna use or share a screenshot of a web page. I've got few reasons for you right now. You can use screenshots in presentations, blog posts, documents, just to show interesting stuff to your friends or for the purpose of troubleshooting such as if you can't figure out something on a web page where others cannot see publicly or wanna point out specific error visually to someone else not with you.
Yeah, I know you can think of many more reasons why someone wanna use or share a screenshot. But sometimes prior to use or share a screenshot, you may have to edit your screenshot to crop a portion, erase sensitive information or to annotate and make it more helpful for viewers. I think you are now picturing few more tools for cropping, erasing and annotating images. What if I can show you an all-in-one tool for all purposes?
Yeah, I know you can think of many more reasons why someone wanna use or share a screenshot. But sometimes prior to use or share a screenshot, you may have to edit your screenshot to crop a portion, erase sensitive information or to annotate and make it more helpful for viewers. I think you are now picturing few more tools for cropping, erasing and annotating images. What if I can show you an all-in-one tool for all purposes?
How Did You Capture?
Generally, you can make use of Print Screen button on your keyboard or screen capturing tool to take a screenshot of your screen and save it as an image file. Thereafter you have to attach it in an email, upload or host somewhere where any person can reach and view your screenshot if you wanna share or use it. But if you have to mark something or annotate on your captured screenshot, you have to spend some more time with an image editing software to get it done before you upload it. May be you are not familiar with such a software and have to learn about it before you get it done. So usually the process of capturing, annotating and using or sharing a screenshot is time consuming. But you can capture a web page, annotate and share it easily within few seconds without using or getting know of any other software.
Awesome Extension?
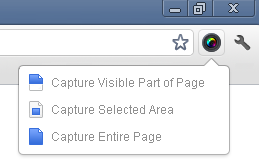
You can do this all on your browser with Awesome Screenshot extension which helps you to capture web pages, annotate and save it to use for your work or share instantly with someone who wanna make use of it. It can be an entire web page, selected area of a web page or visible part of a web page.
After capturing a screenshot, Awesome Screenshot allows you to crop any portion of it. In addition to cropping, you can annotate with rectangles, circles, lines, arrows and you can place texts anywhere on the screenshot.
Also you can erase any sensitive information or part in the screenshot that you don't wanna expose to someone else using blur tool. Eventually you can either save screenshot as an image on your hard drive or store online permanently or temporarily to share with anyone on the web. If you have selected to store your screenshot temporarily, it will store online for about 3 days and remove automatically. It will be really helpful if you just wanna show something on a web page to someone in a jiffy without sending it to someone.
Steps:
1. Install Awesome Screenshot extension on your web browser using below links if you are using one of web browsers given below.
Google Chrome
Mozilla Firefox
Safari
2. Once after installing, navigate to the web page you wanna take a screenshot.
3. Now click on Awesome Screenshot extension on your browser and select your preferred capturing option from available options on drop down menu.
Note: Capture Selected Area option may not work with encrypted pages where you see HTTPS on address bar for security reasons.

4. Select an area to capture if you have selected Capture Selected Area option or else Awesome Screenshot will take a screenshot of current page and navigate to a new tab where you can add edit your captured screenshot by cropping, blurring or adding annotations. Edit your captured image as you need and click Done button.
5. Now either you can save screenshot as an image on your local hard drive or store it online permanently or temporarily to share image link with your friends.
Note: By saving online temporarily, your screenshot will be saved on AwesomeScreenshot.com and will be automatically removed after about 3 days.
Enjoy :-)
8 comments:
This is great Mayura, I had just learned how to use the software (paint and photoshop to do them) Your way here sounds much easier. I can't wait to test it out next time I need to capture one!
Yeah Lisa :) It's really easy and helpful. No need of know how tutorials. I've found it very useful since I wanted to share screenshots with my friends. I was planning to post it out long time ago. So you didn't have to go through Photoshop stuff ;) Just kidding. That's really great you know how to deal with Photoshop. I hope you will love this extension :)
Thanks for stopping by and dropping your ideas dear :)
Cheers...
Hi Mayura,
i have always wanted to know how people take screenshots. people keep using screenshots in youtube videos and on their websites. You have made my work of searching for it easier. You have suggested a very good plugin. I will definitely use it.
Hi Kimberly,
Absolutely :) I've no idea that taking screenshots and annotating is that much easy until I find this extension. It made that process really simple and easy. I hope you got what you were seeking for and now it's time to capture some ;)
Thanks for stopping by and leaving your comments dear...
Cheers...
Hey Mayura,
I didn't know about Awesome Screenshot. What I use is called Screenshot. It was a one time payment and really does the job as far as I use this feature.
It's always good to know about new items or not so new items but that one might not know about. Whatever we may be using, a screenshot device is very useful. I couldn't work without one.
Thanks for sharing this great info :)
Hi Sylviane,
Ohw I've never try out Screenshot. However I'm happy with the capability of Awesome Screenshot. I hope you will love this one too :) It's just beyond taking screenshot. You can send screenshots instantly to friends without uploading on your servers ;) It will take care of uploading and annotating after you taking screenshot. Hope you would love it for it's capabilities.
Thanks for visiting and commenting dear :)
Cheers...
LOOOVE THIS! Thanks Mayura. i get tired of taking screenshots and then having to crop in photoshop. thanks so much for this haven't heard of it and will definitely try it.
Same for me dear :) Mostly I was tired of sending screenshots for my friends when they got a visible problem on their blog or website. You know editing, annotating and uploading - all are time consuming. This extension is really useful to send them up instantly without going through image editing softwares. I hope you will find this really helpful as it has capability of capturing, annotating and sharing :)
Thanks for stopping by and dropping your comment dear :)
Cheers...
Post a Comment