Why do you need maps? Most probably you use maps to get directions to somewhere or find a location. But why do you need to use maps on your website? If you are representing a business or offering services via website, your customers or people who are interested in your business may much prefer to find out where is your company or organization located. However you can just display official address or mention location on your website. Does it make sense? Hmm... for some extent. But sometimes your address could be doubtful for some people. So you can overcome this by displaying a map with directions for someone who wanna come over to your company or organization. Else you may wanna use maps to interpret a location for your audience. However there could be lot of usages beyond what I could think of right now. I ll leave it to you. Would you like to embed a map on your blog or website too?
If someone wanna come over to your company or organization, a map would be really helpful for him/her to figure out directions. Eventhough if someone don't wanna reach out, a map could emphasis about a real business behind the website. Or you just wanna embed a map on your article so your readers find it useful. However if you are looking forward to embed a map on your website, Google Maps is great service to display maps on your website. Basically Google Maps is a map service that you can explore or search locations and get driving directions immediately. Further it helps you create your own custom maps too. However here we gonna help you out with embedding a map on your website.
Before You Go:
If you wanna plot multiple locations on a map, you need to sign in to your Google account. If you haven't got one, create a new Google account.
Steps:
1. Navigate to Google Maps website.
2. Now select as per your requirement, select and follow relevant option from below.
Plot One Location
i. Search for a location or locate the area you wanna display.
ii. Now you need to select map type and attributes you'd like to display. Select them from top right menu.

Notes:
* Some attributes or options such as Photos, Weather may not compatible with embeddable map.
* Use zoom level control and position control on the left of the map to adjust your map display as you would like it to appear on your website.
* Some attributes or options such as Photos, Weather may not compatible with embeddable map.
* Use zoom level control and position control on the left of the map to adjust your map display as you would like it to appear on your website.
Plot Multiple Locations
i. Click on My places button from left pane.
ii. Sign in to your Google account via Sign in button, if you haven't already signed in.
iii. Now click Create Map button.
iv. Add a title for your map and a description if you prefer. Further you can change privacy options as listed.
v. Click on Placemark icon on the map and mark your locations one by one with added title and description on the map.
vi. Now you need to select map type and attributes you'd like to display. Select them from top right menu.

Notes:
* Some attributes or options such as Photos, Weather may not compatible with embeddable map.
* Use zoom level control and position control on the left of the map to adjust your map display as you would like it to appear on your website.
* Some attributes or options such as Photos, Weather may not compatible with embeddable map.
* Use zoom level control and position control on the left of the map to adjust your map display as you would like it to appear on your website.
vii. Save your map and click Done.
viii. Now click on Rate this map link underneath your map details on left pane.
ix. Rate your map and click on your map preview.
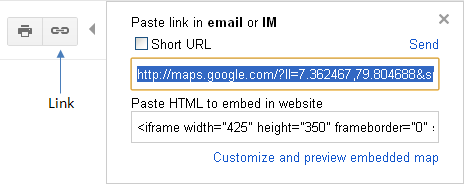
3. Now click on the link icon on left panel.

4. Now click on the link Customize and preview embedded map on the box.
Note: If you can't find Customize and preview embedded map link on the box, you may have selected an incompatible attribute or option at the map display. Try deselecting options such as Photos, Weather.
5. You will get the customization window for your map. Select your preferred map size or enter custom dimension values.
6. At the bottom of customization window you will able to find embeddable code for your map. Now grab your code snippet and add it to your website.
Note: If you are a Blogger user and wanna add it to your layout, you can add your map code snippet via HTML/JavaScript element. Read How to Add an External Widget or Codes to Blogger. Else if you wanna render it in a Blogger post or page, read How to Embed External Content on Your Blogger Posts or Pages.
Enjoy :-)


Nice tutorial - great for small businesses that are brick and mortar to know how to do this for their websites!
Yeah Lisa :) Absolutely... Instead of businesses or organizations, I think it's helpful for authors to include maps in their online articles. BTW thanks for commenting dear...
Cheers...