Nowadays Facebook is a renowned social media platform with unique set of features evolving on the Web. Facebook has given the opportunity to use their native functionality to improve user experience on websites and blogs. As it has more simplified, convenient and personalized social experience, more and more users started to integrate Facebook social platform in to their websites. Basically Facebook offers social plugins to use with their sites to embed social features on their sites. But if wish to integrate Facebook platform more deeper into your site, then you need to create a Facebook application for your site. Oops... But do you know how to create an application for your site?
You need to register your site with Facebook to grab an application for your site. However you can implement Facebook social plugins on your site easily without registering your site. But if you wish to integrate Facebook platform more deeper in to your site, you should register your site with Facebook to get application ID aka API key. For example, if you wish to simplify and enhance user registration and sign in by using Facebook login button, then you have to get a Facebook application for your site to use with Facebook JavaScript SDK to access rich set of client-side features for authentication and authorization purposes. In addition, to enhance the usage of XFBML implementations of social plugins, to moderate all comments made via Facebook comment plugin in your site, you need to register your site with Facebook or create a Facebook application for your site.
Before You Go:
You need to verify your Facebook account in order to grab a Facebook Application. Read How to Verify Your Facebook Account.
You need to verify your Facebook account in order to grab a Facebook Application. Read How to Verify Your Facebook Account.
Steps:
1. Navigate to Facebook Applications page.
2. Click on Create New App button.
3. Enter the name you wish to have for your application in App Display Name field and enter your preferred namespace for your application in App Namespace field.
Note: Namespace must be at least 7 characters and it will use for Open Graph and Canvas page if you gonna make use of them.
Note: Namespace must be at least 7 characters and it will use for Open Graph and Canvas page if you gonna make use of them.
4. Now check I agree to the Facebook Platform Policies option.
5. Click Continue button.
6. Now you will prompt to enter captcha text. Enter captcha text in the box and click Submit.
7. Now you will navigate to application summary page and move on to Basic Info Heading.
8. Enter your domain or subdomain in App Domain field.
Note: If you are hosted your website or blog on a free domain, then add your subdomain here. For example, if your blog on Blogger platform, it should be specified as blogspot.com.
9. If you prefer you can select category of your application via Category drop down box.
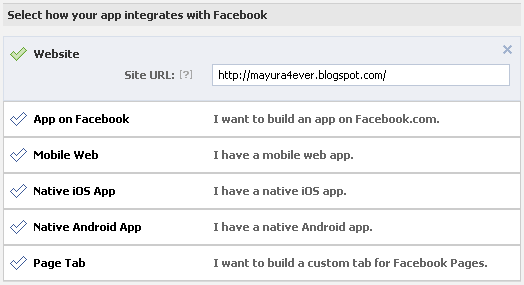
10. Now scroll down and find the heading Select how your app integrates with Facebook.
11. There click on the Website section.
12. Now enter your site URL in the Site URL field.

13. Now click on Save Changes button.
More Information:
You can find your Facebook Application ID aka API key on the top of Facebook Application page correspond to your application. Further you can explore other settings for your application from the left pane.
Enjoy :-)
You can find your Facebook Application ID aka API key on the top of Facebook Application page correspond to your application. Further you can explore other settings for your application from the left pane.
Enjoy :-)


Can you explain the use of namespace and opengraph more.
You can have a brief idea about Open Graph here ~ How to Personalize Your Pages using Open Graph Protocol. Namespace is not much affected here as this one focused on your site. However if you planning to create an Open Graph application, Application for Facebook, Android, iOS or such thing, namespace is used as the primary identifier. Like username to identify your app uniquely :)
Cheers...
Detailed and easy to follow instructions, it is very helpful. Thanks !
Hi Nizam,
Hope it helped you create a basic Facebook application :)
Thank you for commenting and value your compliments...
Cheers...
help. i implemented the fb comment box on my website but i cant seem to do it on the blog which is on blogger. i tried everything u said. am i supposed to do the
JavaScript SDK and Open Graph Protocol FIRST. i tried that too and i still get an error message. pls tell me what is the very 1st step and then maybe i can figure it out. thanks!
Hi Torres,
Yeah, at least you need to have JavaScript SDK implemented on your blog dear :) Then implement Facebook comment box code. If things not work that way, drop your blog URL at the comment section of the post which you were referring to add Facebook comment box. So I can clearly help you on it :)
Cheers...
Hi Nizam,
I'm trying to create a Facebook application for a business fan page. I've verified the account, but when I try to click on the Facebook application link, I'm redirected to my fan page. I'm not able to find any "Create new app" buttons.
Any ideas?
Thanks in advance.
Hi Giorgio,
Oops Nizam? I'm Mayura here mate :)
I hope you have logged in to your Facebook profile already. Are you using Facebook as your Facebook page mate? :)
Cheers...
.Thanks for the tutorial!
You're welcome, Ernest :)