


Blogger offers you a default comment form for your blog to get feedback from your readers. It has moderation and threaded commenting feature too. Mostly comment form is vital as it allows your visitors to ask questions and provide their ideas and thoughts on your content. It's where conversation begins. However default comment form is not the only way you can make use of. If you need you can add third party commenting platforms on your blog. So what do you think, beyond default comment form, if you can add stylish comment plugin to your blog easily? Also what if your comment form can give more exposure to your content in addition to commenting?
It has Social Features
Facebook is a successive and popular social media platform on the web right now. Beyond the social media capability at Facebook, it offers series of social plugins for webmasters to use on external blogs and websites. Facebook comment box is such a useful and search engine friendly plugin offered by Facebook for webmasters. It follows the way how commenting happens at Facebook social networking website itself. It is stylish and enable users to share comment stories on user's Facebook wall with the link back to your content. So in addition to commenting, it will add more exposure to your content on Facebook too. As there are most users already on Facebook, most of your readers don't need to sign up to comment on your blog too.
However before you implement Facebook comment plugin, you need to keep in mind that if you are wish to migrate your blog to another domain, existing comments made via Facebook comment plugin will no longer displayed after the migration. So it is recommended to make sure that you are not gonna migrate to another domain later on, as Facebook comment plugin doesn't provide a way to migrate your existing comments. Also remember that if you revert back to Blogger default comment form, you will lose existing Facebook comments too.
Eventhough Facebook offers comment plugin code officially, you may find it difficult when you implement it in Blogger. If so you can learn how to implement comment plugin for each post after going through this post. In addition, here you can learn how to add moderation capability for your comment box too. Moderation allows you to moderate comments and to find in which pages the recent comments were happened. So you can use Facebook comment plugin more efficiently and productively in your blog. Are you ready to get Facebook comment plugin in your blog?
Limitations
However before you implement Facebook comment plugin, you need to keep in mind that if you are wish to migrate your blog to another domain, existing comments made via Facebook comment plugin will no longer displayed after the migration. So it is recommended to make sure that you are not gonna migrate to another domain later on, as Facebook comment plugin doesn't provide a way to migrate your existing comments. Also remember that if you revert back to Blogger default comment form, you will lose existing Facebook comments too.
Implementation...
Eventhough Facebook offers comment plugin code officially, you may find it difficult when you implement it in Blogger. If so you can learn how to implement comment plugin for each post after going through this post. In addition, here you can learn how to add moderation capability for your comment box too. Moderation allows you to moderate comments and to find in which pages the recent comments were happened. So you can use Facebook comment plugin more efficiently and productively in your blog. Are you ready to get Facebook comment plugin in your blog?
Before You Go:
* If you wanna implement this plugin on your website, read How to Add Facebook Comment Social Plugin to Your Website.
* Decide whether you keep or disable default comment feature on Blogger. If you wanna disable comment feature on your blog, read How to Enable or Disable Comments in Blogger.
* Set up Facebook JavaScript SDK and Open Graph Protocol on your blog.
Steps:
1. Go to Blogger Dashboard.
2. Click on your Blog Title.
3. Navigate to Template from left pane.
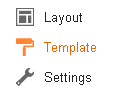
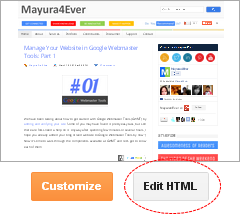
4. Now click Edit HTML button.
5. Now search for <data:post.body/> in your template and add below comment plugin code after that. You can either use XFBML code or HTML5 code to implement XFBML version of comment plugin.
2. Click on your Blog Title.
3. Navigate to Template from left pane.
Note: Before editing your template, you may want to save a copy of it. Read How to Back Up Your Template.
4. Now click Edit HTML button.
5. Now search for <data:post.body/> in your template and add below comment plugin code after that. You can either use XFBML code or HTML5 code to implement XFBML version of comment plugin.
Notes:
* Adding below <data:post.body/> will place your comment plugin under the post. If you need to place it elsewhere on post page, read How to Position Elements on a Blogger Post Page.
* You may encounter two search results for <data:post.body/>. Add this code right after the first resulted line of code.
XFBML Markup
<b:if cond='data:blog.pageType == "item"'>
<fb:comments id='fbcomments' expr:href='data:post.url' expr:title='data:post.title' num_posts='2' width='500' colorscheme='light'/>
</b:if>
<fb:comments id='fbcomments' expr:href='data:post.url' expr:title='data:post.title' num_posts='2' width='500' colorscheme='light'/>
</b:if>
Note: The XFBML markup of this plugin may not support earlier versions of Internet Explorer. In order to enhance compatibility with older Internet Explorer versions, add below XML namespace to your root HTML tag.
i.e: <html b:version='2' ..... xmlns:fb="http://ogp.me/ns/fb#">
xmlns:fb="http://ogp.me/ns/fb#"
i.e: <html b:version='2' ..... xmlns:fb="http://ogp.me/ns/fb#">
HTML5 Markup
<b:if cond='data:blog.pageType == "item"'>
<div class="fb-comments" id='fbcomments' expr:data-href="data:post.url" expr:data-title='data:post.title' data-num-posts="2" data-width="500" data-colorscheme="light"></div>
</b:if>
<div class="fb-comments" id='fbcomments' expr:data-href="data:post.url" expr:data-title='data:post.title' data-num-posts="2" data-width="500" data-colorscheme="light"></div>
</b:if>
Color Indication Information:
- Number of posts/comments displayed
This will set default number of comments to be displayed under Facebook comment box and other comments will be collapsed. If you wanna show all comments under the comment box, then remove this value with the attribute completely.
i.e: num_posts='2'
- Width of comment plugin, in pixels
- The color scheme of your comment plugin, specify light or dark.
- Conditional Statement
This line validates your page and manage to show comment box only on post pages. If you need to show your comment box also on homepage for each post, then replace this line with line of code below.
<b:if cond='data:blog.pageType != "static_page"'>
Note: If you wanna customize the visibility of comment box on pages, read How to Show/Hide Elements on Different Pages in Blogger.
6. Now Save your template and check for new comment plugin under posts.
More Information:
* Now you are done with adding Facebook Comment plugin. If you would like to show Facebook comment count along with the comment box, just add below line of code after or before comment plugin code.
<a expr:href='data:post.url + "#fbcomments"'><fb:comments-count expr:href='data:post.url'/> Comments</a>
* Your comment moderation tools and settings will be displayed as follows with comment box, or you can access them via Facebook Comment Moderation Tool site.

* You can find more insights for your comments at Facebook Insights page.
Enjoy :-)
